Comper
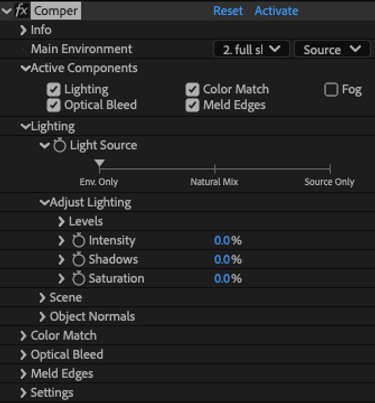
Overview:
Comper offers multiple modules that help incorporate a foreground image onto a selected background / environment. It helps match lighting and color, as well as optical traits. Comper takes layer transformations into account, so there's no need to precompose the used layers for the composite to get them to overlap correctly. Position your layers as you like, and Comper does the rest.
Parameters:
Main Environment:
Selects the target to which all the modules will help match the image. Without a main environment selected, the effect is bypassed completely.
Active Components:
Toggles the active modules on and off, for easy checking of each modules contribution to the final result.
Lighting:
The lighting module simulates directional lighting coming from the environment, helping incorporating the foreground object into the background in a much more natural way.
Light source:
Determines how the different light sources are mixed together. “Env” stands for light coming from the environment. “Source” stands for light coming from the original image. When the scale is set to env only, the light on the object being composited originates only from the environment. When set to “Natural Mix”, the environment light and the original image lighting equally blend in the same way light sources would blend naturally. When set to “Source Only”, only the light on the original image is used and the environment light has no effect. The scale is continuous and can be set to any mix in between.
Adjust Lighting:
Adjust the light arriving from the blended sources for intensity and chroma. The adjustment affects the light and not the image, meaning desaturating the light won’t desaturate the image.
Levels:
A levels-like interface that controls the “Light” and “Shadow” parameters. The triangular handles operate the same as in a “Levels” effect, except then can be moved beyond their default position for an extended effect. The white and black dots at the top reset the white and black triangular handles respectively back to their default value.
Light:
Adjusts the light intensity. Values over 0 intensify the light, and values below 0 dim it.
Shadow:
Adjusts the shadow intensity. Values over 0 darken the shadows, and values below 0 lighten the shadows.
Saturation:
Adjusts the saturation of the light only, and not that of the image. For example, a slightly blue surface light by white light will remain lightly blue even if the saturation is cranked all the way up. However, it will become very red if lit by lightly red light that turned highly red by high saturation.
Scene:
Some scenes have light sources that are not apparent in the main environment image, yet affect the scene in noticeable way. The parameters in this group allow for adding additional lighting and control the way environment light behaves in the scene.
Preview:
Shows a graphic representation of where each environment image is located in respect to the object, how light is dispersed, and where the additional distant light is located.
Main Environemnt Group:
Controls the usage of the main environment in the lighting scene.
Distance:
Affects the uniformity and falloff of the light coming from the environment. The further the environment is, the more uniform the lighting on the object. The closer the environment, the more accented a highlight region’s effect would be close to it and the more it would fade as the object moves away from the light source. For example, the sun is a far away light source and therefore it would scatter evenly throughout the frame. A candle would light intensively close by, and fade drastically across the frame.
Adjust Intensity:
Adjusts the light intensity. Values over 0 intensify the light, and values below 0 dim it. Is specific to the main environment, unlike the global light adjust settings which apply to all scene components.
Extra Environemnt Group:
An optional extra layer that would add it’s light to the main environment. This applies only for lighting purposes, and is not reflected in any of the other modules using the main environment.
The extra environment is attached to the main environment and shares both it’s distance and usage in the front light with the main environment.
Source:
Select the extra environment layer. Set to “None” to turn off the usage of this optional layer.
Adjust Intensity:
Adjusts the light intensity. Values over 0 intensify the light, and values below 0 dim it. Is specific to the extra environment and is independent of the main environment’s intensity settings.
Front Light:
Controls the light coming from the front, as opposed to the main environment which affects the back and sides.
Source:
When set to “None”, the main environment is used as the front light source as well as the back. If an extra environment source is active, it too is used in the front light along with the main environment. When a layer is selected, it is used as a custom front light source.
Distance:
Same effect as the main environment distance, but applies exclusively to the front light. Even when no layer is selected for the front light, it determines the distance of the main environment coming from the front separately from the distance of the light coming from the back.
Adjust Intensity:
Is available only when a custom layer is selected for the front light. When no layer is selected, the main environment is used for the front light, along with it’s designated intensity settings. When a layer is selected it affects only that layer’s component in the front light mix.
Add BG Light To Front:
Is available only when a custom layer is selected for the front light. When a front light layer is selected, it allows to determine how much of the main environment is mixed into the custom front light.
Distant Light:
Controls a custom distant light source that adds to the lighting scene. The distant light creates parallel rays that come from a defined direction and not a specific spot, meaning that if set to 45 degrees, it would light all objects from an angle of 45 degrees regardless of their position in the frame.
Active:
Toggle the distant light on and off.
Color:
Sets the distant light’s color.
Adjust Intensity:
Adjusts the distant light’s intensity. Positive values increase intensity, while negative values dim the light.
Direction:
Sets the “z-rotation” direction from which the distant light will be projected. 0 would place the See the Scene Preview for a graphic representation of the light’s direction.
Front/Back:
Sets the depth from which the distant light will be projected. Positive values move the light to the front of the object, where when at 100% the light is coming exactly from the front. Negative values move the light to the back. A value of 0 places the light on the same plane as the object, so a depth value of 0 with the Direction value of 0 would place the light directly above the object.
Object Normals:
Directional lighting requires telling which way the object is facing at every pixel. A normal map is utilized for this purpose.
From:
Select the source of the normal map. These are the options and their unique controls:
Input Process:
generates a normal map by using the regular input image’s rgb and alpha data.
Control Type:
Choose To Control the input normal map generation by the size of the object in the frame (“By Size”), or by setting absolute values to parameters (“Manual”).
By Size Controls:
Shape Preview:
A graphic representation of the “Object Size In Frame” control, as well as the state of the roundness and bump controls.
Object Size In Source Frame:
For correct interpretation of the image, set the current size of the object in the frame. The size refers to the source image, and not the size in the composition. For example, if an object fills the source image almost entirely spanning from one side to the other, but in the composition it is a small element either because it’s originally small or it was scaled down, the “Size In Frame” should be set to a large value as it describes the size in the source. See the “Shape Preview” interface for the resulting size. Larger values mean bigger size in frame, where 0 means extreme long shot, and 100 means extreme close up.
Roundness Amount:
Sets how flat or round the object is. It’s a relation between the object size and how it bulges forwards at it’s center. For example, humans are considered round, while a warrior’s shield is considered slightly round as it bulges only a little big relative to it’s size. See the “Shape Preview” interface for the resulting roundness.
Bump Amount:
Sets how much “texture” the object has. While the “Roundness” describes the overall shape, Bump Amount determines the detail within the shape. Negative values flip the inwards/outwards direction of the texture detail. See the “Shape Preview” interface for the resulting texture.
Manual Controls:
Roundness Amount:
Same control as in “By Size”.
Roundness Inwards Depth:
The distance between the object edge and the inwards position where rounding tapers off. Larger values mean a larger shape curve.
Bump Amount:
Same control as in “By Size”.
Bump Smoothness:
The blur size to apply to the bump map to smooth out the detail. The larger the value, the more large features are accented (such as folds in fabric) and the less small details are apparent (such as fine fabric texture). This smoothness affects lighting only, and doesn’t affect the object itself.
Normal Map:
Use a standard normal map for the object. Such maps can be generated for 3D renders, or for any image using specialized software.
Source:
Select the layer with the normal map.
X Axis:
Select the channel from which the x axis facing will be determined. Red is the industry standard, and is therefore the default value.
X Axis Flip:
In rare cases, the channels may be reversed in value to direction relation. This option flips the value to correct the issue.
Y Axis:
Select the channel from which the y axis facing will be determined. Green is the industry standard, and is therefore the default value.
Y Axis Flip:
In rare cases, the channels may be reversed in value to direction relation. This option flips the value to correct the issue.
Depth Map (Requires 16/32BPC):
A standard depth map can be converted to a normal map, However due to 8bpc limitations to 256 levels, the results are hardly useful in that color mode. For use of a depth map, a 16/32 depth map source must be used, and the project must be set to at least 16bpc, and preferably 32bpc. The use in 8bpc mode is not restricted, but please be aware of the problem.
Channel:
The channel from which to take the depth values. Depth maps are usually in gray scale, so selecting red green or blue should yield the same result. Change the channel in special circumstances where the depth map is not monochromatic.
Adjust Steepness:
Depth maps can be interpreted for any depth range. Adjust the steepness to achieve the desired curve steepness for the object.
Invert Depth:
Some depth map renderers use white to describe close pixels and others use black. Comper uses interprets white as close. Use this option to invert the depth map if needed.
Render Normal Map To Output:
View the generated normal map. It is HIGHLY recommended to adjust the normal map parameters while viewing the map. Once comfortable with the effect of each normal map control, tweaking while watching the final output instead of the map becomes more intuitive.
Color Match:
Similar to the “Color Match Analyzer” effect, this module matches the color of the source image to the color of the main environment.
When To Analyze Color Matching:
This parameter allows to determine when the matching between the source image and the main environment is done. It is usually desirable to match the colors at a certain time in the scene, where the object is fully seen and the scene is at a “representing” time without some prominent abnormalities. For example, matching at a moment where a red truck obscures most of the frame will result in the object being tinted red to match, therefore it is preferable to match at “neutral” times in the scene.
Auto - When Changing Parameters:
This option triggers analysis whenever any of the effect's controls is being changed, so matching is done for the currently viewed time assuring “what you see is what you get”. When this option is selected, the source and target colors are static and can not be animated or modified manually by any other means.
Manual:
Matching analysis occurs only when clicking the “Analyze Color Match - Now” button. When this option is selected, the analyzed source and target colors are exposed in the effect controls and can be animated and modified manually as well.
Continuous (May Flicker):
Matching is done one every frame render. Use with caution as variations over time in the image or environment will result in varying matching. While generally undesired, for highly dynamic scenes where lighting varies wildly this option will adapt on a frame by frame basis and may help embed the object into the scene correctly in such situations. For example, a nightclub scene where lighting constantly changes and flickers.
Controls:
The matching controls are the same as in the “Color Match Analyzer” effect. Please refer to it’s user guide for detailed explanation on the individual controls.
Fog:
Adds a blurred copy of the environment over the object, immersing it in the scene colors.
Amount:
The opacity of the for on top of the object. At 100%, the object is completely obscured by the fog.
Scattering:
Determines how blurred the environment is on top of the object. The higher the value, the thicker the fog appears.
Optical Bleed:
Simulates optical light contamination from the object’s edges inwards, as would happen when the background is highly luminant. For example, when an object is shot against a bright sky, some light is bound to scatter through the object’s contour into it’s near surface.
Amount:
Controls the opacity of the contour light on top of the object.
Luma Cutoff:
Determines at what luminance level does the light begin to affect the object. Lower values mean less cutoff and therefore more pronounced effect. It is recommended to amplify the effect using the “Amount” control, and not compromise the cutoff, as having a too low cutoff will result in the entire object being surrounded by some bright contour, which sets it apart from the scene instead of embedding it. Adjust the cutoff so that only the brightest parts of the background affect the object.
Depth:
The size of the inwards contour breach. Higher values mean a thicker bleed of the background light into the object contour.
Meld Edges:
Blurs the contour of the object together with the background. It affects hard edges only, as soft edges are naturally blended together.
Size:
The thickness of the strip inside and outside the object contour to be affected. Higher values mean thicker blurred edges. It is recommended to use in an amount that matches the apparent blending of other objects in the scene. It should not replace the usage of “Smart Matte Shrink”, which is better suited to rid of redundant edge thickness instead of hiding it with noticeably overdone melding.
Settings:
Lighting Accuracy/Speed:
Trading off lighting scene accuracy with performance. For most cases using a highly downscaled version of the environment for lighting is good enough. Scenes where lighting detail in the background are very small yet prominent might get weakened by downsampling, and selecting a more strict setting can resolve the issue. At the setting of “1/2", the lighting scene is at half the normal resolution, and is the slowest to process. At “1/32”, the lighting scene is at 1/32 the normal resolution and processing is the fastest. For most cases 1/8 - 1/16 is good enough, and going higher in resolution doesn’t yield any noticeably better results.